Showing posts with label button lovers. Show all posts

Monday, July 7, 2014

Birthday Girl Gift Set With Button Lovers

Hey friends, I am back and it is MONDAY! :) 
I have a project I created quite a while ago to share today- it
was for Button Lovers, you know I send some of my special projects
in once in a while to them. 
 I created this gift bag, card, tag, wand set for them using their beautiful buttons. 
 I made so many of these fan flowers I made my boys help me. 
 And I topped them off with the beautiful buttons. 
 Here is one side of the wand. 
 And the other, it was such a fun set to make!
Every piece was made with love. 
I used CutCardStock, 
Xyron Creative Station, 
Hot Glue, 
 White Gift Bag,
 Liquid Pearls,
 Ribbons Unlimited Ribbon.
Photobucket

Tuesday, June 24, 2014

Love Blooms More Button Fun!

Hey there friends,
I created this layout a few months ago for Button Lovers,
they used it in some sort of advertising campaign. :) 
It's finally ok to share this fun projects. 
I used Samantha Walker Cut Files for the butterflies and flowers, 
then added cool buttons for embellishments. 
I also used Clear Scraps acrylic for the base. 
These beautiful butting are actually wood. 
I love creating layouts what I can!
Have a beautiful Tuesday my friends 

Photobucket

Thursday, May 29, 2014

Love And Joy With Buttons!

Good morning! 

As you know I do several projects for Blumenthal Lansing
aka Button Lovers..and this was a project I did for one of their
ad promos I believe? I am never sure where they land. :) 
 It's an acrylic mini album I created using Clear Scraps. 
 Plenty of cool buttons too! I mean of course, it is Button Lovers after all. 
Every page was adhered using my Xyron 9" Creative Station.
The Buttons were stuck on with Xyron Adhesive Dots.
I ope you like the album- you never know where you might spot it! 
Love me some Blumenthal Lansing buttons, the best there is. 

See you tomorrow!
Photobucket

Tuesday, April 22, 2014

Party with Buttons, Xyron, and Anna Griffin

Hey there friends happy Tuesday,
I received these amazing buttons this week and had to use them
so I grabbed some beautiful Anna Griffin tags and went crazy!
 I used Ribbons Unlimted Dazzle Ribbons and stitched the tags to
it using a zig zag stitch on my sewing machine. 
How fun is this banner? I love it. 
 All the colors and textures make me smile. 
 It's not too big, not too small and used up some leftover Thickers!
Next time you want to make a banner try those old tags
or some new amazing tags! :) 

Photobucket

Wednesday, March 12, 2014

FREE SVG And Giveaway SW Blog Hop!

Good morning friends, are you ready to win today??
It's that time of month- the Samantha Walker Creative Team Blog Hop
and the month's theme is LUCKY!

My project is a card and a hair bow gift holder! :) 
Which by the way, I found a cool way to display them too. 
Let me share how I made it. 
I cut the SW "I'm The Lucky One" file using my CutCardStock card stock. 
Then I ran it through my 9" Creative Station and placed it on my card face. 
Cut next file out: Clover Bag Topper on the base piece
run through Xyron face side down- this creates a sticky side for the
gold glitter!
Add your super awesome GLITTER!
Then take a folded piece of white card stock and adhere it to the back 
to create a little mini stand. 
Now on the front you can add your embellishments and add these 
little Xyron Adhesive dots to hold the hair clips into place! Perfect too!
I added some cool buttons the both cards and some twine too. 

  
Here is the blog hop info and the prizes:

The blog hop will begin is now and you have to comment by Sunday, 03/16 at 11:59pm MDT in order to be eligible for the free SVG/Silhouette file as well as the prize...which will be the Spellbinders® Botanical Swirls Expandable Pattern
This is the FREE SVG giveaway from Samantha:

And the next stop on the blog hop is
Happy Hopping Friends!!! :)
Have a lovely day~ 
Photobucket

Monday, March 10, 2014

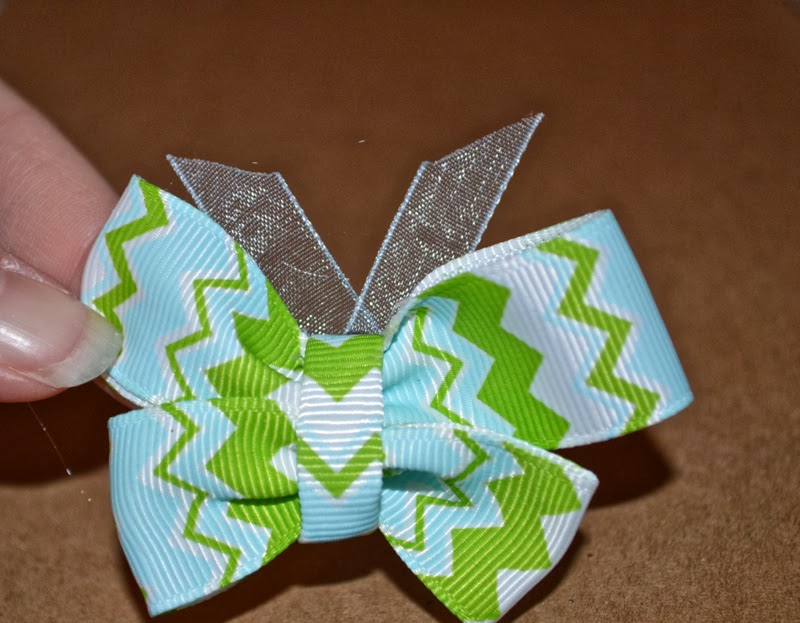
Making Ribbon Butterfly Hair Clips Tutorial

Hey friends, it is officially Monday and I spent the weekend
at the field doing photos. 
BUT I wanted to share this Butterfly Ribbon Hair Clip tutorial that I created
perfect for spring and that special girl in your life. 
I love how fun they are. 
I actually tried to find some ribbons butterflies online and
honestly I did not like them- any of them so I decided to make my own! :)
Trim out 7.8" ribbon 2 shorter and 2 longer. 
 Heat all edges.
Fold like a bow and stitch. 
 Stitch shorter tot he longer as shown. 

 Trim out a 1 1/2" piece of ribbon and 2 antennas.
 Tri fold 7/8" ribbon and glue. 

 Wrap around to cover stitching. 
 Adhere antennas behind, and add buttons on top. 
Adhere to a hair clip. 
That is IT! Fun and easy right?! 
Anyways I have fun projects coming all week so stay tuned!
Happy Monday friends~
Photobucket