Showing posts with label DIY. Show all posts

Saturday, December 3, 2016

Snowy Forest Scene Layout Display


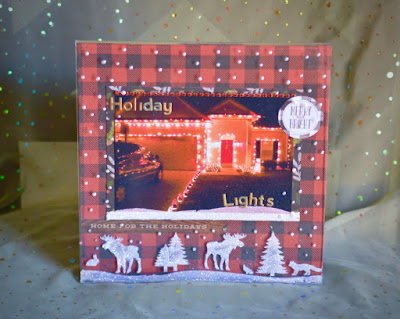
Happy Saturday my friends, I am here today with the Creating Made Easy Featured Project for the month, this Snowy Scene Stenciled Page Display with a fun wintery Holiday Lights 8x8 Layout. My very first December 2016 Creating Made East Kit project!

The Feature Project means every Creating Made Easy December kit ordered will arrive at your doorstep with step by step instructions to create this project, including exactly how I stenciled the Page Frame. 

Have you seen the beautiful detailed in this 6X6 Rustic Forest Mascil (Stencil)? Its absolutely one of my favorite Mascils that Clear Scraps has ever designed! Not only the beautiful snowscape but the moose, bunny, and coyote all there together. 
For those I used Modeling Paste and glitter (of course) and a white Pearl Pen. 

I cannot wait to make other layouts to slide in and out of this display, I am going to use it all winter long. 
The layout I also used the 6X6 Rustic Forest Mascil, I just used the snowmen, and left out the trees and forest creatures.

I absolutely love winter crafting and this kit made me feel like I could stay in a cabin all winter just to decorate it. You might not love snow, but the beauty of it is amazing and fun for all Christmas and winter projects. Loving the My Mind's Eye in this kit, the paper is fabulous.
Grab yours while they last!
I cannot wait to share the other projects and I have seen the new designers, they are amazing!

Wednesday, November 16, 2016

Mustache Holiday Tree?! Hipster Fun Project

Hey there friends, I have kind of an unusual fun project to share for MOVEMBER- if you had not heard of Movember- it's really all about mustaches in November. 
I thought it would be fun to make a Hipster Holiday Tree and Card for one of my mustache fanatic friends to celebrate men's health. Such a great idea, why not have fun with it.
I wanted it to be masculine yet still shine for the holidays, so I painted the 3D Chipboard X-Mas Tree black then used metallic gold paint to stencil on the Mustaches Mascil/Stencil. Then I added black pearls.
For the card I used a black shimmer cardstock, that I fitted to the Acrylic Coaster and added 1" at the top for the border punch and fold over. 
It was a fun little kitchy project to create and perfect for November, I can't wait to see my friend's face, it is the holiday season and all sorts of decor goes, why not make it YOURS!
I hope you like my fun project today, happy November friends.
Until next time, keep on checking the Clear Scraps blog and mine for more project ideas, and keep checking back for even more new releases!


Thursday, September 22, 2016

Favorite Times Fall Layout

Good morning friends, have you seen the fabulous Creating Made Easy September Kit and a layout I created using this kit?
 Creating Made Easy September Kit Leaf Layout Pinky Hobbs3
I took brown cardstock from my stash as a base, and used light brown paint and the 12X12 Fall Leaves Stencil to create the background side panel, then sprinkled with glitter while the paint was still wet. 
Creating Made Easy September Kit Leaf Layout Pinky Hobbs1
Shake off excess before it dries.
Creating Made Easy September Kit Leaf Layout Pinky Hobbs2
Then add the patterned paper as shown below. 
Creating Made Easy September Kit Leaf Layout Pinky Hobbs4
You can see I added a banner using the stickers in the September kit as well as the title.
Creating Made Easy September Kit Leaf Layout Pinky Hobbs5
This is one of my favorite photos of me and my boys, it was a fun kit to create layouts, albums and more. Check out all the designer projects.
Grab your kit here!
Have a beautifully crafty day,

Friday, August 19, 2016

Beachy Layout With Mirrors!

Happy Friday friends! I am lucky enough to have friends in
Florida, so I get to jaunt over once in a while and the August Kit
from Creating Made Easy was perfect for those beach pics!

I love the Mirrored Banners included plus the beautiful papers
with a vintage feel. 
Check out this fun kit. It's ONLY 29.99!

I still love scrapbooking pages when I get a chance. 
<3 by.="" for="" nbsp="" p="" popping="" thanks="">
Pinky

Tuesday, June 21, 2016

A Night To Remember Fireworks Mini Album


Hey there friends Happy Tuesday,
Check out this Fireworks Splash Stenciled Mini Album I made from the
It s the feature project for the Creating Made Easy  June Kit. 
which means every single kit comes with instructions for this album. 
Including photos of course, and yes I used my favorite 
Krylon spray paints for this one. 
 This Creating Made Easy  June Kit.  was so cute and fun to create with. 
Perfect for the July 4th photos. 


Be sure to grab your Creating Made Easy  June Kit while it lasts!
Have a beautifully crafty day friends.
Pink~

Thursday, June 9, 2016

Mini Banner for July 4th!

Hey there friends, it's been a hot minute since I have blogged but
I have been crafting as always! Funny how life runs round but my heart is still
in the room creating. :)
This is a mini banner I created using the Creating Made Easy  June Kit. 

There is even a full tutorial for it on the Creating Made Easy Blog!
I used Gesso and loved it!

Plus my favorite Krylon paints that I always love, 

I cant wait to see the boys faces on the 4th this year! :)
Happy Thursday friends!

Pinky <3 p="">


Tuesday, May 3, 2016

Today Life Is Good Custom Album

Hey there friends, Happy Tuesday. 
I have been doing so many photoshoots lately I decided to use one to
create a mini album using the Creating Made Easy May 2016 Kit this time!
It was fun to use the pics from the shoot to create an album. 
I cannot wait to take my boys out and get pics this weekend. 
I am dying over these Webster's pages papers and sticker embellishments. 
 On this mini a filled in the pages with patterned paper and took scraps to make 
contrast edging. 
 Also on the front of each page I used gold metallic paint around the edges. 
There were a couple pages I wanted the matting to be larger so I painted the entire page,
then used a large matting that overlapped the chipboard pages of the 
Clear Scraps Tabby Album from the kit. 
Even the fun vine ribbon was included in the kit, it is a beautiful scrapbook kit this month 
and perfect for not only scrapbooking but mixed media as well. 
Grab yours while they are available, only 29.99!

Photobucket

Monday, May 2, 2016

LIVE Desktop Plaque Craft

Hello Monday and help friends!
Have you seen the Creating Made Easy May 2016 Kit? I mean it is drop dead gorgeous! Such a combo of colors and style, I am in love!
Included in the kit is the Clear Scraps LIVE Expression with is so fun, plus some gorgeous Webster's Pages papers and stickers that you'll love as much as I do. 
For this desktop sign I made (To remind myself to LIVE and breathe) I painted the back of the LIVE Expression with paint so the front would be nice and glossy. Then I put pearls all over the front using a Pearl Pen. 
After I allowed everything to dry, I trimmed out pattered papers that was all included in the kit and made it the perfect desktop size. 
Using Beacon Zip Dry adhesive I adhered the Clear Scraps LIVE Expression to the paper dotting it where the pearl dots are to perfectly conceal the adhesive. 
I also added some stickers form the May 2016  kit that were fun sentiments. I then took a heavy duty card stock, folded it lengthwise and adhered half to the back so it would stand tall on my craft desk. 
I am willing to bet this Creating Made Easy May Kit flies off the shelf, between the Mini Album, and perfectly adorable papers, it's going to go quick so grab yours now!
Here is a link to the details in the kit and it's only 29.99 including USA shipping. 
Happy Monday and happy crafting friends!!

Thanks for staying with me through the divorce and my crafting less! I love you all. 
Pink~


Photobucket

Wednesday, February 17, 2016

ALL the crafts ALL the time!

Happy HUMP DAY friends,
yes I have another craft today, this one is an adorable 
MINI Acrylic Clipboard Dry Erase Board!
If you love adult coloring, her are ways to apply the coloring
to your every day crafting! :)
I colored all these butterflies and put them on using solvent base adhesive. 
And instead of using patterned paper behind the clipboard? I actually
took spray adhesive, placed a 4X6 card behind the Clear Scraps clipboard. 
Added glitter after spraying the adhesive on. 
I allowed it to dry fully, then I spray painted the back of the clipboard with
light pink Krylon spray paint!

How fun is that? I loved making it. You can buy the kit here and the 
new MINI Clear Scraps Acrylic Clipboards are so tiny and cute and
make fantastic crafts!! I love them. 

What are you working on this week?
Have you tried Krylon paints on your projects? Man they are fun.

Have a beautifully crafty day my friends. :)


Photobucket

Monday, January 18, 2016

Spring...It's Coming Right?

Hey there friends, I know it's the dead of winter, which
I enjoy all seasons but I had a lot of fun creating this Brand New Release
They have WINTER and SUMMER as well of course. 
For those one I used one of the new Mascil/Stencils and painted on the
front of it with Krylon. On the back I graduated the paint in several colors. 

I also added the Butterfly Mixers from Clear Scraps. I love spray painting shit!
Krylon is definitely my GO TO. 

I have fodun spray paint to be so versatile for crafting 
in the scrapbooking world. I am not sure why more people don't
try it? I mean it works great on scrapbook paper too, it
never been the papers, and you can do cool designs. 
Some of the mists and sprays end up drinking everything...not spray paint! 
This is the BOMB! LOL I am so on it. 

Happy Monday friends. 

Photobucket

Monday, January 4, 2016

NEW CHA 2016 Release! Cell Phone Stand!

Hope you enjoyed your holidays! I had a little
break for Christmas to hit up Orlando. It was fun but so busy!

I have oodles of projects to share so stick around!
NEW Release for CA 2016, this cool Cell Phone Stand from Clear Scraps!
I used Blue and Gold Metallic paint from Krylon of course, and 
a new Mascil from CS as well. 
I love how it sits on my table or counter but I made it myself!
Check out all the new goodies!
Happy Monday friends. 

Photobucket

Wednesday, May 28, 2014

Leather Wrap Bracelet How To

Hey there again,

So most of you know I am not a girly girl, I love jewelry don't get me
wrong but I am covered in tattoos and not really that prissy chick. 

When I found Leather wrap bracelets I realized I could totally
make them myself the size I wanted and incorporate Connie Crystal
crystals into them for a fun look. 
 I love high quality jewelry just on the more trendy rough looking side. :)
 I found some 2MM leather cording, and doubled it to around 2 feet.
You could use longer or shorter, it's whatever you want.
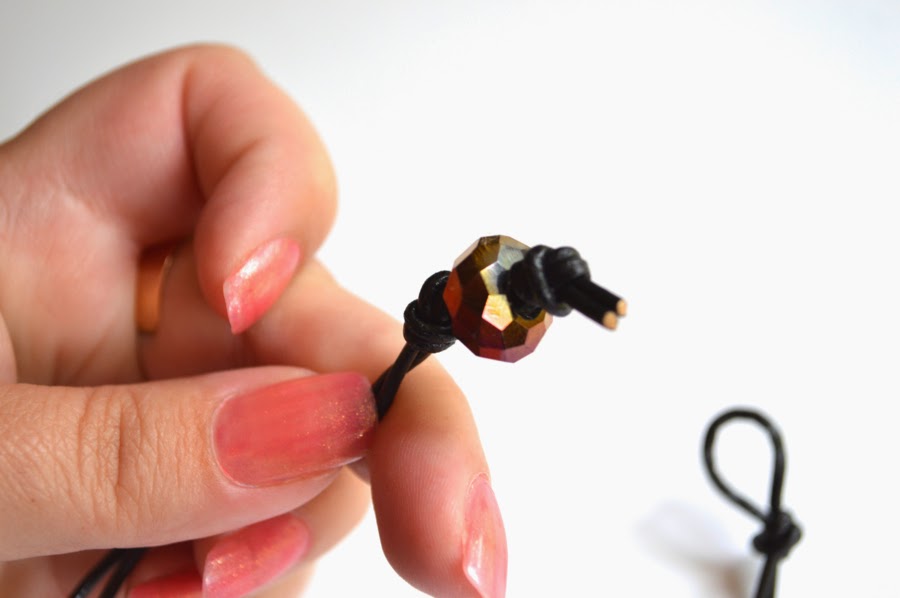
 Tie a knot in the end making a loop to catch the crystal bead.
 Then thread the Connie Crystal crystal bead through,
knotting underneath and on top leaving a little room to slide.
Wrap bracelet around wrist, and simply loop over to catch 
bead and you are set! Easy to wear on wrist, ankle, or even neck, 
Connie Crystal had the perfect accent I wanted. 

Photobucket