Showing posts with label card tutorials. Show all posts

Thursday, March 6, 2014

Spring Fun With Xyron, Miss Katie, and ...

Welcome to the Xyron, Miss Kate's Cuttables Blog Hop!
Can't wait for someone to WIN BIG this week.

I have a step by step tutorial for this card I created and it's a fun one.
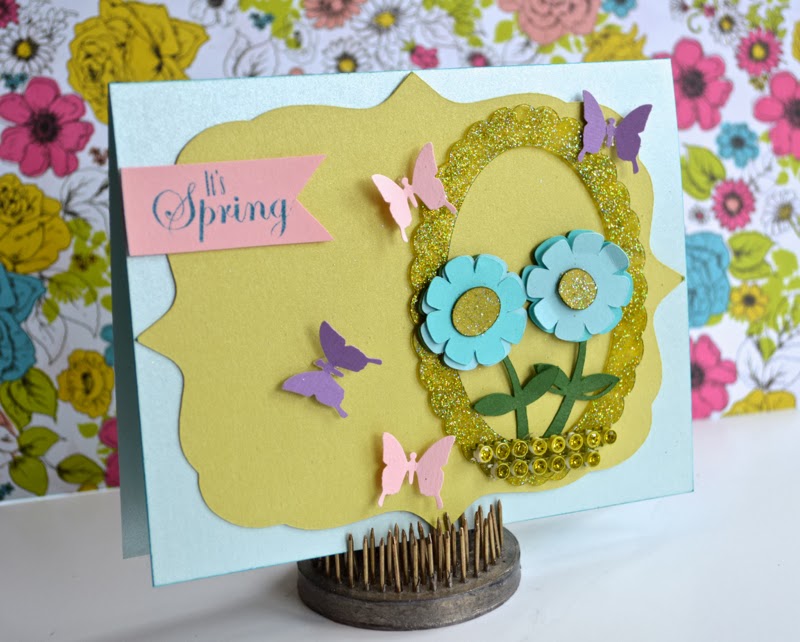
 Spring spring spring, bring on SPRING!
Cut Your background shape using Miss Kate's Cuttable Background Shape
with the CutCardStock Metallics. Be sure to set die cut machine to deep
cuts, and lengthen the blade as well. 
 Using Xyron Adhesive Dots 3/8 assemble the flowers,
leaving the middle dots off. 
 Alcohol ink and glitter flower centers. Allow to dry then use 
Xyron Adhesive Dots 3/16 to adhere to the top of the flower. 
Use alcohol ink and ink crystal mesh (Connie Crystal)
Take Clear Scraps Frame- alcohol ink and glitter. 
Stamp sentiment (Avocado Arts) onto CutCardStock.
Cut into pennant shape. 

 Use Xyron Adhesive Dots 3/16 dots to adhere frame- 
as you can see you can't even see them!
Now assemble card using Xyron Adhesive Dots 3/8 YES
the whole card! :) 
 I took the Xyron Adhesive Dots 3/16 and 
rolled them to adhere the punched butterflies :) 
Isn't this Curious Metallic card stock super cool too? 
I set my blade on deep cut and it cut wonderfully! 
I love how it goes hand in hand with the cuts and the beautiful shimmer. 
He sure to HOP this week to Miss Kate's Cuttables:

And of course the awesome Xyron Blog:


Photobucket

Wednesday, November 13, 2013

Step By Step Christmas Card Tutorial!

Good morning and happy hump day my friends, 

So here is my holiday theory (since you all wanted to know I am sure).
You cannot ever EVER have too much glitter during the holidays
EVER!

In keeping with that- 
I thought today I would randomly post a step by step tutorial for a 
Christmas card, since I am starting on my cards and I have all these fun
products to play with! :) 
 I will let the photos tell the story: you will need...
 Crate Paper, Gold embossing powder, Heat Gun, Avocado Arts 
Xyron Glue Stick, chunky white glitter, scissors, trimmer, 
white card stock card base (4.5X6"), Liquid Pearls or Pearl Pen
a sheet of foam and Xyron Sticker Maker to make pop dots. 


 It's glittered, it's fun and it's CHRISTMAS!
If you have any questions just holler at me in the comments!
I will be back tomorrow with a big project- so stay tuned!!! :) 
Thanks for popping by friends....

Photobucket

Wednesday, September 11, 2013

Grateful For You..Always

Good morning friends, 

I have a special project to share today- this card I created on the CutCardStock
blog that says Grateful For You- and especially on this day I am very grateful
to ALL of the first responders and military this great place has.
It's my first project for CutCardStock and I have a step by step tutorial on
their blog right here. http://www.cutcardstock.blogspot.com/
I would love for you to head over and see it.

I used the amazing CutCardStock products and my Avocado Arts
stamp set! :) I love this combo for sure. 

So as we remember today- I send my love and gratefulness to all of the amazing
people who dedicate their lives to keeping us safe and well protected. 
Photobucket

Thursday, June 28, 2012

~No Worries- Fun In The Sun Card!~

Good morning my friends, 

I wanted to share a fun shaped card that I created for Trinity Arts.
How fun is this?? It's a flip flop card or as they say in Hawaii
a "slipper" card. :) I love it. 

If you want to find instructions for this card I have them on the 
Trinity Arts Blog right here.
I used the beautiful Clearsnap Smooch Inks, and Colorbox ink
to make the edges pop out a little and for the sentiment. 
Now tomorrow I have a special blog hop, be sure to come back! :) 
Have a wonderful Thursday my friends. 

OH don't forget my class begins this week! You can take it day or night. 
ANYTIME! and the class stays open after it is ended too! :) 
Check it out please and pass the word along too.

Photobucket